编写一个自己的webpack插件plugin

简介

插件是 webpack 的支柱功能。webpack 自身也是构建于,你在 webpack 配置中用到的相同的插件系统之上!插件目的在于解决 loader 无法实现的其他事。
要想写好插件就要知道Webpack中的两个比较核心的概念compilercompilationtapable。在webpack 编译流程已经都要记录。
Webpack 通过 Plugin 机制让其更加灵活,以适应各种应用场景。 在 Webpack 运行的生命周期中会广播出许多事件,Plugin 可以监听这些事件,在合适的时机通过 Webpack 提供的 API 改变输出结果。

实现一个 plugin

一个 webpack plugin 基本包含以下几步:

  1. 一个 JavaScript 函数或者类
  2. 函数原型(prototype)中定义一个注入compiler对象的apply方法。
  3. apply函数中通过compiler插入指定的事件钩子,在钩子回调中拿到compilation对象
  4. 使用compilation操纵修改webapack内部实例数据。
  5. 异步插件,数据处理完后使用callback回调

最后会实现一个简单的clean-webpack-plugin

一个简单的插件

1
2
3
4
5
6
7
8
9
10
11
12
13
14
class WebpackCleanupPlugin {
// 构造函数
constructor(options) {
console.log('WebpackCleanupPlugin', options);
}
// 应用函数
apply(compiler) {
console.log(compiler);
// 绑定钩子事件
compiler.plugin('done', (compilation) => {
console.log(compilation);
});
}
}

如何使用在 webpack.config.js 中引入并且使用如下:

1
2
3
4
5
6
7
8
9
10
11
12
13
14
15
16
17
18
19
20
21
22
23
24
25
26
27
28
29
30
31
32
const MiniCssExtractPlugin = require('mini-css-extract-plugin');
// 引入自己的插件
const WebpackCleanupPlugin = require('./WebpackCleanupPlugin');
module.exports = {
devtool: 'source-map',
mode: 'production',
entry: {
index: './src/index.js',
chunk1: './src/chunk1.js'
},
output: {
filename: '[name].[chunkhash].js'
},
module: {
rules: [
{
test: /\.css$/,
use: [MiniCssExtractPlugin.loader, 'css-loader']
}
]
},
plugins: [
// 提取css插件
new MiniCssExtractPlugin({
// Options similar to the same options in webpackOptions.output
// both options are optional
filename: '[name].[contenthash].css'
}),
// 使用自己的插件
new WebpackCleanupPlugin()
]
};

自己写的插件如下执行:

  • webpack 启动后,在读取配置的过程中会先执行 new WebpackCleanupPlugin() 初始化一个 WebpackCleanupPlugin 获得其实例。
  • 在初始化 compiler 对象后,再调用 WebpackCleanupPlugin.apply(compiler) 给插件实例传入 compiler 对象。
  • 插件实例在获取到 compiler 对象后,就可以通过 compiler.plugin(事件名称, 回调函数) 监听到 Webpack 广播出来的事件。
  • 并且可以通过 compiler 对象去操作 webpack

Compiler、Compilation

  • Compiler 对象包含了 Webpack 环境所有的的配置信息,包含 optionshookloadersplugins 这些信息,这个对象在 Webpack 启动时候被实例化,它是全局唯一的,可以简单地把它理解为 Webpack 实例;Compiler中包含的东西如下所示:

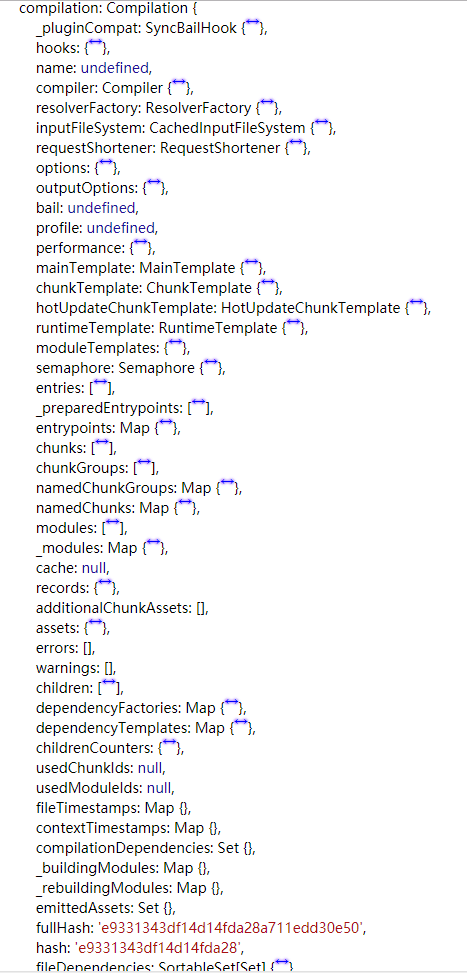
  • Compilation 对象包含了当前的模块资源、编译生成资源、变化的文件等。当 Webpack 以开发模式运行时,每当检测到一个文件变化,一次新的 Compilation 将被创建。Compilation 对象也提供了很多事件回调供插件做扩展。通过 Compilation 也能读取到 Compiler 对象。

Compilation中包含的东西如下所示:

Compiler 和 Compilation 的区别在于Compiler 代表了整个 Webpack 从启动到关闭的生命周期,而 Compilation 只是代表了一次新的编译。

Compiler 钩子compilation 钩子

一个简单的清除文件插件


每次打包如果文件有修改会生成新的文件,文件的hash也会跟着变化,那么这个改变了的文件,他以前的文件就是无效的了,要把以前的文件清除掉,我们使用比较多的就是clean-webpack-plugin,这里自己实现一个简单的文件清除。如果不知道hash、contenthash、chunkhash的区别可以看这一片文章。

大致分为以下几步:

  • 获取output路径,也就是出口路径一般为dist
  • 绑定钩子事件 compiler.plugin('done', (stats) => {})
  • 编译文件,与原来文件对比,删除未匹配文件 (同时可以 options 设置要忽略的文件)

代码实现如下

1
2
3
4
5
6
7
8
9
10
11
12
13
14
15
16
17
18
19
20
21
22
23
24
25
26
27
28
29
30
31
32
33
34
35
36
37
38
39
40
41
42
43
44
45
46
47
48
49
50
51
52
53
54
55
56
57
58
59
60
61
62
const recursiveReadSync = require('recursive-readdir-sync');
const minimatch = require('minimatch');
const path = require('path');
const fs = require('fs');
const union = require('lodash.union');

// 匹配文件
function getFiles(fromPath, exclude = []) {
const files = recursiveReadSync(fromPath).filter((file) =>
exclude.every(
(excluded) =>
!minimatch(path.relative(fromPath, file), path.join(excluded), {
dot: true
})
)
);
// console.log(files);
return files;
}

class WebpackCleanupPlugin {
constructor(options = {}) {
// 配置文件
this.options = options;
}
apply(compiler) {
// 获取output路径
const outputPath = compiler.options.output.path;
// 绑定钩子事件
compiler.plugin('done', (stats) => {
if (
compiler.outputFileSystem.constructor.name !== 'NodeOutputFileSystem'
) {
return;
}
// 获取编译完成 文件名
const assets = stats.toJson().assets.map((asset) => asset.name);
console.log(assets);
// 多数组合并并且去重
const exclude = union(this.options.exclude, assets);
console.log(exclude);
// console.log('outputPath', outputPath);
// 获取未匹配文件
const files = getFiles(outputPath, exclude);
// const files = [];
console.log('files', files);
if (this.options.preview) {
// console.log('%s file(s) would be deleted:', files.length);
// 输出文件
files.forEach((file) => console.log(' %s', file));
// console.log();
} else {
// 删除未匹配文件
files.forEach(fs.unlinkSync);
}
if (!this.options.quiet) {
// console.log('\nWebpackCleanupPlugin: %s file(s) deleted.', files.length);
}
});
}
}
module.exports = WebpackCleanupPlugin;

上面的这个插件实现了一个清除编译文件的效果。在这里就不做实验了,如果有兴趣可以自己把代码 copy 到本地,运行一下看一下结果。

总结

在上面大致知道怎么写一个简单的清除文件的webpack插件,其实还可以做更多的事情如下:

  • 读取输出资源、代码块、模块及其依赖(在 emit 事件发生)
  • 监听文件变化 watch-run
  • 修改输出资源 compilation.assets

具体实现可以看一下一下webpack 深入浅出

参考

干货!撸一个 webpack 插件(内含 tapable 详解+webpack 流程)
看清楚真正的 Webpack 插件